
Wednesday, July 13, 2011
After school brownie muffins: The Recipe
A commenter noticed that I never posted a recipe for these muffins that I posted about way back when I started this blog (not so long ago, really). When I started, I wasn't sure I was going to include a recipe in every post. But let's face it, that's what I want when I see something that looks good--gimme the recipe so I can try it for myself! So, without further ado, I'm sending you back to the original post, now new and improved, recipe included. Click on the link below!


Wednesday, June 29, 2011
Sponge roll with chocolate glaze
 Here's a cake I hadn't tried before, but will definitely make again. Looks so fancy and complicated, but it comes together very quickly. (A little hint: even if your squabbling "helpers" distract you and you forget to add the flour to the sponge cake batter, the final result will still be edible. Next time decline "help" until the decorating stage.) The sponge cake is really just a vehicle for the filling, something to spread the chocolate on. I've got some other flavor combinations swimming about in my brain...lemon sponge with berry jam and whipped cream, something with peaches and pecans....
Anyhow, there are a lot of directions here, but don't be discouraged. Just read them through a couple of times beforehand. It's actually quite a simple procedure once you try it. The kids helped with the decorating and it still turned out pretty professional looking, so you can do it, too! (Chocolate and powdered sugar look good in any form, right?)
 Sponge cake:
1/4 cup sugar
4 large eggs, separated
3 Tbsp. sifted all-purpose flour
pinch of salt
confectioner's sugar
Chocolate glaze:
6 ounces semisweet chocolate
1 ounce unsweetened chocolate
3 Tbsp. prepared coffee
3 Tbsp. unsalted butter
2 Tbsp. rum
1 cup chocolate shavings (use a swivel vegetable peeler to shave curls off a bar of chocolate--any kind but unsweetened--work over a piece of wax paper and refrigerate the shavings until ready to use)
confectioner's sugar
Heat oven to 350 degrees. Line a jelly-roll pan (mine is 17"x11") with foil and grease it well with butter or baking spray.
With an electric mixer, beat 3 Tbsp. of sugar (reserve 1 Tbsp.) with the egg yolks at high speed until they are cream colored (about 5 minutes). Add the flour and beat on low, just until incorporated.
In a second bowl, with clean beaters (or the whisk attachment on a stand mixer), beat the egg whites and pinch of salt until they begin to thicken. Add the reserved tablespoon of sugar, and beat until the whites hold their shape, but are not yet stiff and dry.
Fold one-third of the whites into the yolk mixture, then another third, and then the final third. Do not mix more than necessary. Quickly and gently spread the batter into the jelly-roll pan and smooth it into the corners. Bake for about 15 minutes, or until the top springs back when lightly pressed with your finger.

Remove the cake from the oven and immediately sift confectioners sugar generously over the surface of the cake. Cover the cake with a long piece of wax paper, and then cover the wax paper with a cookie sheet. Holding them firmly together, flip the jelly-roll pan over onto the cookie sheet. Remove the pan and peel the foil off the bottom of the cake. Then roll the warm cake and the wax paper tightly together from the narrow end. Let the cake roll stand on the cookie sheet until cool.
While the cake is baking and cooling, make the glaze. Melt the chocolates and the coffee in a small saucepan over low heat. Stir until smooth. Add the butter and stir until it is melted and completely incorporated. Remove from the heat and stir in the rum. Let it cool to room temperature.
When the cake is cool, put the pan of glaze into a larger bowl of ice water and stir constantly until it thickens slightly. Reserve 1/3 cup of glaze for the top of the cake. Unroll the sponge and spread the glaze evenly to the edges of three sides of the cake; leave an inch or so unfrosted on one narrow end. Reroll the cake (without the wax paper inside this time!), and then spread the reserved glaze over the top and sides with a small spatula. Sprinkle the chocolate shavings over the glaze (you will have to gently press them into the sides), and then refrigerate the roll for 30 minutes, or until the glaze is firm.
Remove roll from the refrigerator, transfer to a serving platter, and sift confectioner's sugar generously over the top. Serve at room temperature, birthday candles optional.

Tuesday, June 28, 2011
Blueberry pie
 It was Father's Day, and the father of my children had wisely packed up his library book and taken the oldest two to the pool, while I stayed home with He-Who-Will-Not-Nap. It was humid and cloudy, and 80-some degrees, both in and outside the house. The air conditioning had died. And there I was in the kitchen, with all the windows open and the oven set to 400 degrees, baking a blueberry pie.
 Despite the heat, there's something to be said for listening to the cardinals and sparrows calling from the backyard while rolling out a pie crust, as if time has stood still for fifty years or so. I could hear lawnmowers buzzing and a baby crying in the distance. My baby doesn't cry like that anymore--time does rush on. He was singing from his bed, with wooden trains, teddy bears, books and an assortment of dollhouse furniture scattered about him. And then he crept down the stairs, finally appearing in the kitchen to announce, "I waked up! And I need a snack."
 That evening we celebrated with grilled steak, creamed spinach, and blueberry pie with ice cream. We ate our pie outside on the patio to catch the breeze. Mmmmm...summer. You're not going to get such a pie in any other season. The blueberries were juicy and jammy all at once, the crust buttery and flaky, but sturdy enough to stand up to the warm fruit filling.
I must confess to a small revelation: cutting the butter into the flour by hand (with a pastry blender) is infinitely superior to mixing it in the food processor. I seem to overmix in the food processor, and lose the flaky pockets of butter that you get from mixing more slowly with the pastry blender.
I first made this discovery a month or so ago, when I made a quiche for a weeknight dinner. The crust was puffed and layered, reminiscent of puff pastry, but without all the work. I hadn't done anything complicated or magical. I used cold butter, ice water, unbleached flour and a pinch of salt. I chilled the dough for at least 30 minutes before rolling it out. No time in the freezer, no vinegar or vodka or shortening in the recipe. Maybe you have more restraint than I do with the pulse button on the food processor. If not, try it by hand. I figure the time I spend mixing is saved by not having to wash all the nooks and crannies in the Cuisinart bowl!

Blueberry pie
2 pints fresh blueberries
3/4 cup sugar
1/4 cup flour
2 Tbsp. fresh lemon juice
1 tsp. grated lemon peel
All-butter pie crust (but abandon your food processor and mix it by hand!)
heavy cream
 Prepare pie crust and chill the disks of dough for at least 30 minutes. Rinse and drain blueberries, then combine with sugar, flour, lemon juice and lemon peel. Crush a few blueberries with the back of a spoon and mix with the rest of the berries. Let stand for about 15 minutes.
Place the oven rack in the lower third of the oven and heat to 400 degrees. Roll out the chilled dough into two 12-inch rounds. Transfer one to a 9-inch glass pie dish. Spoon the filling into the crust. Cut the second round into 1/2-inch wide strips and arrange in a lattice on top of the filling. Press the strips into the edges of the bottom crust, trim the overhanging dough, and crimp the edges decoratively. Brush the crust lightly with heavy cream. Sprinkle on a little sparkling sugar, if desired.
Place the pie on a rimmed baking sheet and bake for 40 minutes. Cover the the edge of the crust with aluminum foil or a pie crust shield. Bake another 15-20 minutes, until the filling is bubbling in the center and the crust is golden on top and bottom. Cool pie on rack at least 2 hours. Serve with vanilla ice cream.

What dessert says summer to you?

Monday, June 13, 2011
Farmer's Market Blueberry Muffins
Saturday morning we packed up the kids and went to our first farmer's market of the summer. I think it might have been the first time in eight years that we did not take a stroller. Another milestone. We came home with a bag of multi-colored fingerling potatoes, two big bunches of asparagus (some of which turned into this salad), and a pint of blueberries. After sampling a few (not a sour one in the bunch), I used the whole box in my favorite blueberry muffin recipe on Sunday morning.

The muffin batter is really just a means to bind the blueberries together, topped with a buttery crumb topping. These are not sturdy muffins that would survive a child's backpack; these are delicate and tender, best still warm from the oven and borne gently to the breakfast table in a basket. (I bet Dad wouldn't mind them, along with a cup of coffee and a handmade card, on his tray for Father's Day breakfast in bed.) Frozen berries will not do. Save this recipe for the best fresh blueberries you can find.
Blueberry muffins
adapted from The Gourmet Cookbook
6 Tbsp. unsalted butter
1/3 cup light cream or half-n-half
1 large egg
3/4 tsp. vanilla extract
1 1/2 cups flour
3/4 cup sugar
1 1/2 tsp. baking powder
3/4 tsp. salt
2 cups fresh blueberries
Topping:
2 Tbsp. cold unsalted butter, cut into small chunks
1/3 cup flour
3 Tbsp. sugar
Heat the oven to 375 degrees. Grease 12 muffin cups.
Melt butter in microwave or in a saucepan over low heat. Whisk in milk, egg and vanilla until well combined.
In another bowl, whisk together flour, sugar, baking powder and salt. Add liquid mixture and stir until just combined. Fold in the blueberries. Scoop the batter into the muffin cups.
Combine the topping ingredients in a small bowl and rub together with your fingertips until it begins to crumble and clump together. Sprinkle the crumb topping evenly over the muffin batter.
Bake until golden and crisp, and a wooden pick comes out clean, about 20-22 minutes. Cool in the pan on a rack for 10 minutes, then run a knife around the edges of each muffin and carefully remove from the cups. Serve warm.


The muffin batter is really just a means to bind the blueberries together, topped with a buttery crumb topping. These are not sturdy muffins that would survive a child's backpack; these are delicate and tender, best still warm from the oven and borne gently to the breakfast table in a basket. (I bet Dad wouldn't mind them, along with a cup of coffee and a handmade card, on his tray for Father's Day breakfast in bed.) Frozen berries will not do. Save this recipe for the best fresh blueberries you can find.
Blueberry muffins
adapted from The Gourmet Cookbook
6 Tbsp. unsalted butter
1/3 cup light cream or half-n-half
1 large egg
3/4 tsp. vanilla extract
1 1/2 cups flour
3/4 cup sugar
1 1/2 tsp. baking powder
3/4 tsp. salt
2 cups fresh blueberries
Topping:
2 Tbsp. cold unsalted butter, cut into small chunks
1/3 cup flour
3 Tbsp. sugar
Heat the oven to 375 degrees. Grease 12 muffin cups.
Melt butter in microwave or in a saucepan over low heat. Whisk in milk, egg and vanilla until well combined.
In another bowl, whisk together flour, sugar, baking powder and salt. Add liquid mixture and stir until just combined. Fold in the blueberries. Scoop the batter into the muffin cups.
Combine the topping ingredients in a small bowl and rub together with your fingertips until it begins to crumble and clump together. Sprinkle the crumb topping evenly over the muffin batter.
Bake until golden and crisp, and a wooden pick comes out clean, about 20-22 minutes. Cool in the pan on a rack for 10 minutes, then run a knife around the edges of each muffin and carefully remove from the cups. Serve warm.

Wednesday, June 8, 2011
Chocolate chip cookies: classic for a reason


So the first recipe I tried was the one for chocolate chip cookies, made with 100% whole wheat flour. It lends a subtle nuttiness, without screaming, "I'm healthy!" These definitely hit that crispy/chewy balance, and everyone loved their giant size. I made a couple adaptations to the recipe to fit my pantry (no quick runs to the store during nap time!), substituting light brown sugar for the dark, and semi-sweet chocolate chips for the bittersweet chunks. The result was excellent, but now I'm curious to taste the difference. Better quality chocolate can only be better, and I suspect that the dark brown sugar may lend a touch more moistness and depth of flavor. Today I was at the market, and made sure to pick up the missing ingredients. I guess I'll have to make them again and report back, if I don't get distracted by all the other fascinating recipes in this book. In the meantime, here's the straight-from-the-pantry version, because when you need cookies, there's no time to run to the store.
 Chocolate Chip Cookies
adapted slightly from Good to the Grain
3 cups whole wheat flour
1 1/2 tsp. baking powder
1 tsp. baking soda
1 1/2 tsp. kosher salt
8 oz. cold unsalted butter, cut into pieces
1 cup light brown sugar
1 cup sugar
2 eggs
2 tsp vanilla extract
8 oz. semi-sweet chocolate chips
Heat oven to 350 degrees. Line two baking sheets with parchment or Silpat. Sift the dry ingredients together into a large bowl. Add the butter and sugars to the bowl of a stand mixer and beat on low with the paddle attachment, about 2 minutes. Scrape down the sides of the bowl, then add the eggs one at a time, mixing after each. Mix in the vanilla. Add the flour mixture to the mixing bowl and blend on low just until combined. Scrape down the sides again, and add the chocolate chips. Mix on low for a few seconds more, then scrape the bowl one last time, making sure the chips are evenly distributed.
Scoop mounds of dough about 3 Tbsp. in size on the the baking sheet, 6 cookies to a sheet. Bake for about 18 minutes, rotating the sheets halfway through. Remove the cookies and cool briefly on a wire rack. These are best the first day, but will keep in an airtight container for 3 days.

Wonderful note from the cookbook author: Don't chill this dough and then try to scoop it--it's too difficult. If you don't have time to bake the entire batch, scoop all the cookies and chill the extra balls of dough in a sealed container in the refrigerator. They'll keep for a week.
Saturday, May 28, 2011
Sparkling sugar cookies
 It's Memorial Day weekend, and I have the perfect cookie recipe for you, whether you're having a backyard BBQ, hitting the pool or beach for the first time this year, or just staying home doing laundry and watching the rain fall. (Yes, that last option is mine. But if the weather turns by Monday, we'll have some cookies to take to the pool!)
 I know, I know...there are a million sugar cookie recipes. Why should you try this one? It's soft and chewy in the middle, with crispy edges and a crackled sugar top. It's not brittle or crumbly, so it's a perfect candidate for a picnic basket or a lunchbox. It does take three bowls, but you don't need a mixer. The recipe was developed by the test cooks at Cooks' Illustrated, so you know it's been engineered for success. I did adapt the instructions slightly, because my first batch did not turn out very pretty; the cookies all ran together and I had to cut them apart. By reducing the number of cookies on the baking sheet, they turned out perfectly round. And we loved the festive addition of crunchy sparkling sugar instead of regular sugar as a topping.
I was a little skeptical about the yield of this recipe--only two dozen? That's not going to last more than 48 hours in my house! But these cookies bake up into 3-inch rounds, so everyone was content with just one cookie at a time. We should have enough to get us through the weekend, whatever the weather, and maybe a couple left over for lunches on Tuesday.
Sparkling Sugar Cookies
adapted from Cooks' Illustrated
2 1/4 cups all-purpose flour
1/2 tsp baking soda
1 tsp baking powder
 1/2 tsp table salt
1 1/2 cups sugar, plus 1/4 cup for rolling
2 ounces cream cheese, cut into pieces
6 Tbsp. unsalted butter, melted
1/3 cup vegetable oil
1 large egg
1 Tbsp. milk
2 tsp vanilla extract
sparkling sugar for topping
Heat the oven to 350 degrees. Line baking trays with parchment paper or silicone baking mats. Whisk flour, baking soda, baking powder and salt together in a medium bowl. Place 1/4 cup sugar in a shallow dish and set aside.
 In a large bowl, add 1 1/2 cups sugar and cream cheese, and then pour the warm butter over and whisk to combine. Whisk in oil, and then add egg, milk and vanilla. Whisk until smooth. Add the flour mixture and mix with a rubber spatula until the dough comes together.
Scoop the dough, about 2 tablespoons for each cookie, and roll into balls. (The dough will be very soft. Handle it quickly and gently, and don't worry about getting them perfectly round until after you've tossed them in the sugar.) Roll the balls in the reserved sugar, and place on baking tray in staggered rows, no more than 8 per tray. Flatten balls with the bottom of a glass until 2 inches in diameter. Sprinkle tops with sparkling sugar.
Bake, one tray at a time, until edges are set and golden, 11 to 13 minutes, rotating the tray after 7 minutes. Cool cookies on the tray 5 minutes, then transfer to a wire rack to cool completely.

Tuesday, May 24, 2011
Chocolate cake with white chocolate cream cheese buttercream
 Almost 11 years ago, I went and made my own wedding cake, and dug myself into a hole that I will never be able to climb out of. If I can make a wedding cake, what's my excuse for not making a cake for every other occasion? Every birthday, anniversary, baby shower, graduation and First Communion. Is a homemade cake better? Absolutely. Cheaper? Positively. And when I'm piping stars on a cake at 10 o'clock at night, I remind myself that this cake is made with love to celebrate another Very Important Family Milestone, and I wouldn't have it any other way.
 Still, things have changed in the Home Baked kitchen since I made that wedding cake. I can't remember the last time I made an Italian meringue buttercream or soaked my cake layers in simple syrup. My current favorite cake is anything from The Cake Bible that involves reverse creaming. You get a flavorful, tender cake with a fine crumb, but it's sturdy enough that you don't need to use extraordinary measures (cardboard rounds and sessions in the freezer) to assemble the cake without disaster. Quick buttercreams or cream cheese frostings are easy and foolproof, and don't require the candy thermometer or another dozen eggs.
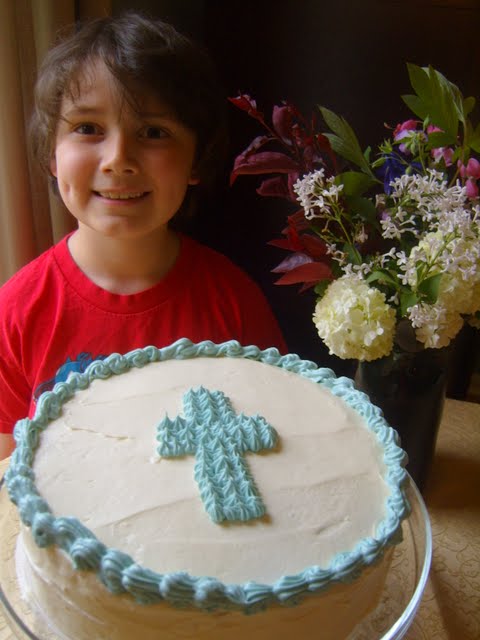
This past weekend we celebrated Eight's First Communion with family and friends, so I made the Perfect All-American Chocolate Butter Cake. I like that it's a cocoa cake--a whole lot cheaper than chocolate bars--and that even though it calls for cake flour, you can easily substitute all-purpose flour plus corn starch. I frosted it with White Chocolate Cream Cheese buttercream, which is rich, tangy, silky and very easy to make. I usually avoid anything with white chocolate--too sweet!--but mixed with cream cheese it achieves the perfect balance. I love the contrast of the tangy sweet buttercream with the chocolate cake, but it would be delicious on almost any cake I can imagine (mmm...carrot cake, I'm thinking of you).
 I kept the decoration simple (and fast!), setting aside about a cup of buttercream to tint for piping. I used a small star tip to create the cross (which I first outlined with a toothpick so it would be centered), and continued with the same tip to make a shell border.
All-American Chocolate Butter Cake
from The Cake Bible
1/2 cup plus 3 Tbsp. unsweetened Dutch process cocoa
1 cup boiling water
3 large eggs
2 1/4 tsp. vanilla
2 cups all-purpose flour
5 Tbsp. cornstarch
1 1/2 cups sugar
1 Tbsp. baking powder
 3/4 tsp. salt
1 cup (8 ounces) unsalted butter, softened
Heat the oven to 350 degrees. Line two 9-inch cake pans with wax or parchment paper, then grease and flour (or use baking spray).
In a medium bowl, whisk together the cocoa and boiling water. Cool to room temperature. In another bowl, combine the eggs, 1/4 of the cocoa mixture, and vanilla.
In the large bowl of the mixer, combine the remaining dry ingredients and mix on low speed for 30 seconds. Add the butter and remaining cocoa mixture. Mix on low until moistened, and then beat on medium speed (high on a hand mixer) for 1 1/2 minutes. Scrape down the sides of the bowl. Add the egg mixture in three batches, beating for 20 seconds after each addition.
Pour the batter into the prepared cake pans and smooth the surface with a spatula. Bake about 30 minutes, or until a toothpick comes out clean. Cool the cakes on a rack for 10 minutes before loosening the sides with a small knife and inverting them onto the cooling rack. When the cake layers are completely cool, wrap them airtight in plastic wrap until you are ready to frost them.
White Chocolate Cream Cheese Buttercream
9 ounces white chocolate (bars, NOT chips, which do not have cocoa butter)
12 ounces cream cheese, softened
6 ounces unsalted butter, softened
1 1/2 Tbsp. freshly squeezed lemon juice
Melt the white chocolate in the top of a double boiler on low heat, stirring frequently, or in the microwave. (My microwave has a "Melt" setting, which works perfectly. Otherwise, use short bursts on low power and remove before all the chocolate is melted--just continue to stir it until it is completely smooth.) Let cool to room temperature.
In the mixer with the paddle attachment, beat the cream cheese until smooth and creamy. Gradually add the cooled chocolate, and then beat in the butter and lemon juice.
This buttercream becomes solid when chilled, so you can refrigerate it and use it later, but you will have to let it warm to room temperature and beat it smooth again. If it seems too warm to pipe, I prefer to set the bowl in another bowl of ice water and whisk until it stiffens slightly.

Subscribe to:
Posts (Atom)